WHYEVER?
Hues in Tubes… and how they made a name for themselves
Some labels are down to earth and simply state how a pigment was made, the process.
For example, Smalt’s name comes from the German smelt, which exists in English too, meaning: “To melt or break down; crumble; disintegrate; fall to bits; fall to pieces”… a most accurate description of the birthing process of the glassy blue pigment in question—not dissimilar to Egyptian frit.
Alizarin comes from the Arabic asara, to squeeze, and when you want to turn a tough madder root into a divine red liquid, I understand quite a lot of squeezing needs to happen. Charcoal, of course, is a charred something: willow/vine twigs, cherries, dates or peach stones, the list goes on and is often reflected in the name of the pigment: Peach Black, Cherry Black, Vine Black (often these days actually willow), Cork Black or just Charcoal. Willow Black, as such, being never mentionned, not that I’ve heard anyway. The latest baby in this charred list (soon to hit art stores!) is Algae Black. Made with renewable biomass waste from algae farms and produced through a carbon-negative process, this pigment powder and liquid dispersion might soon replace petroleum-derived Carbon Black… pretty exciting, don’t you think?1
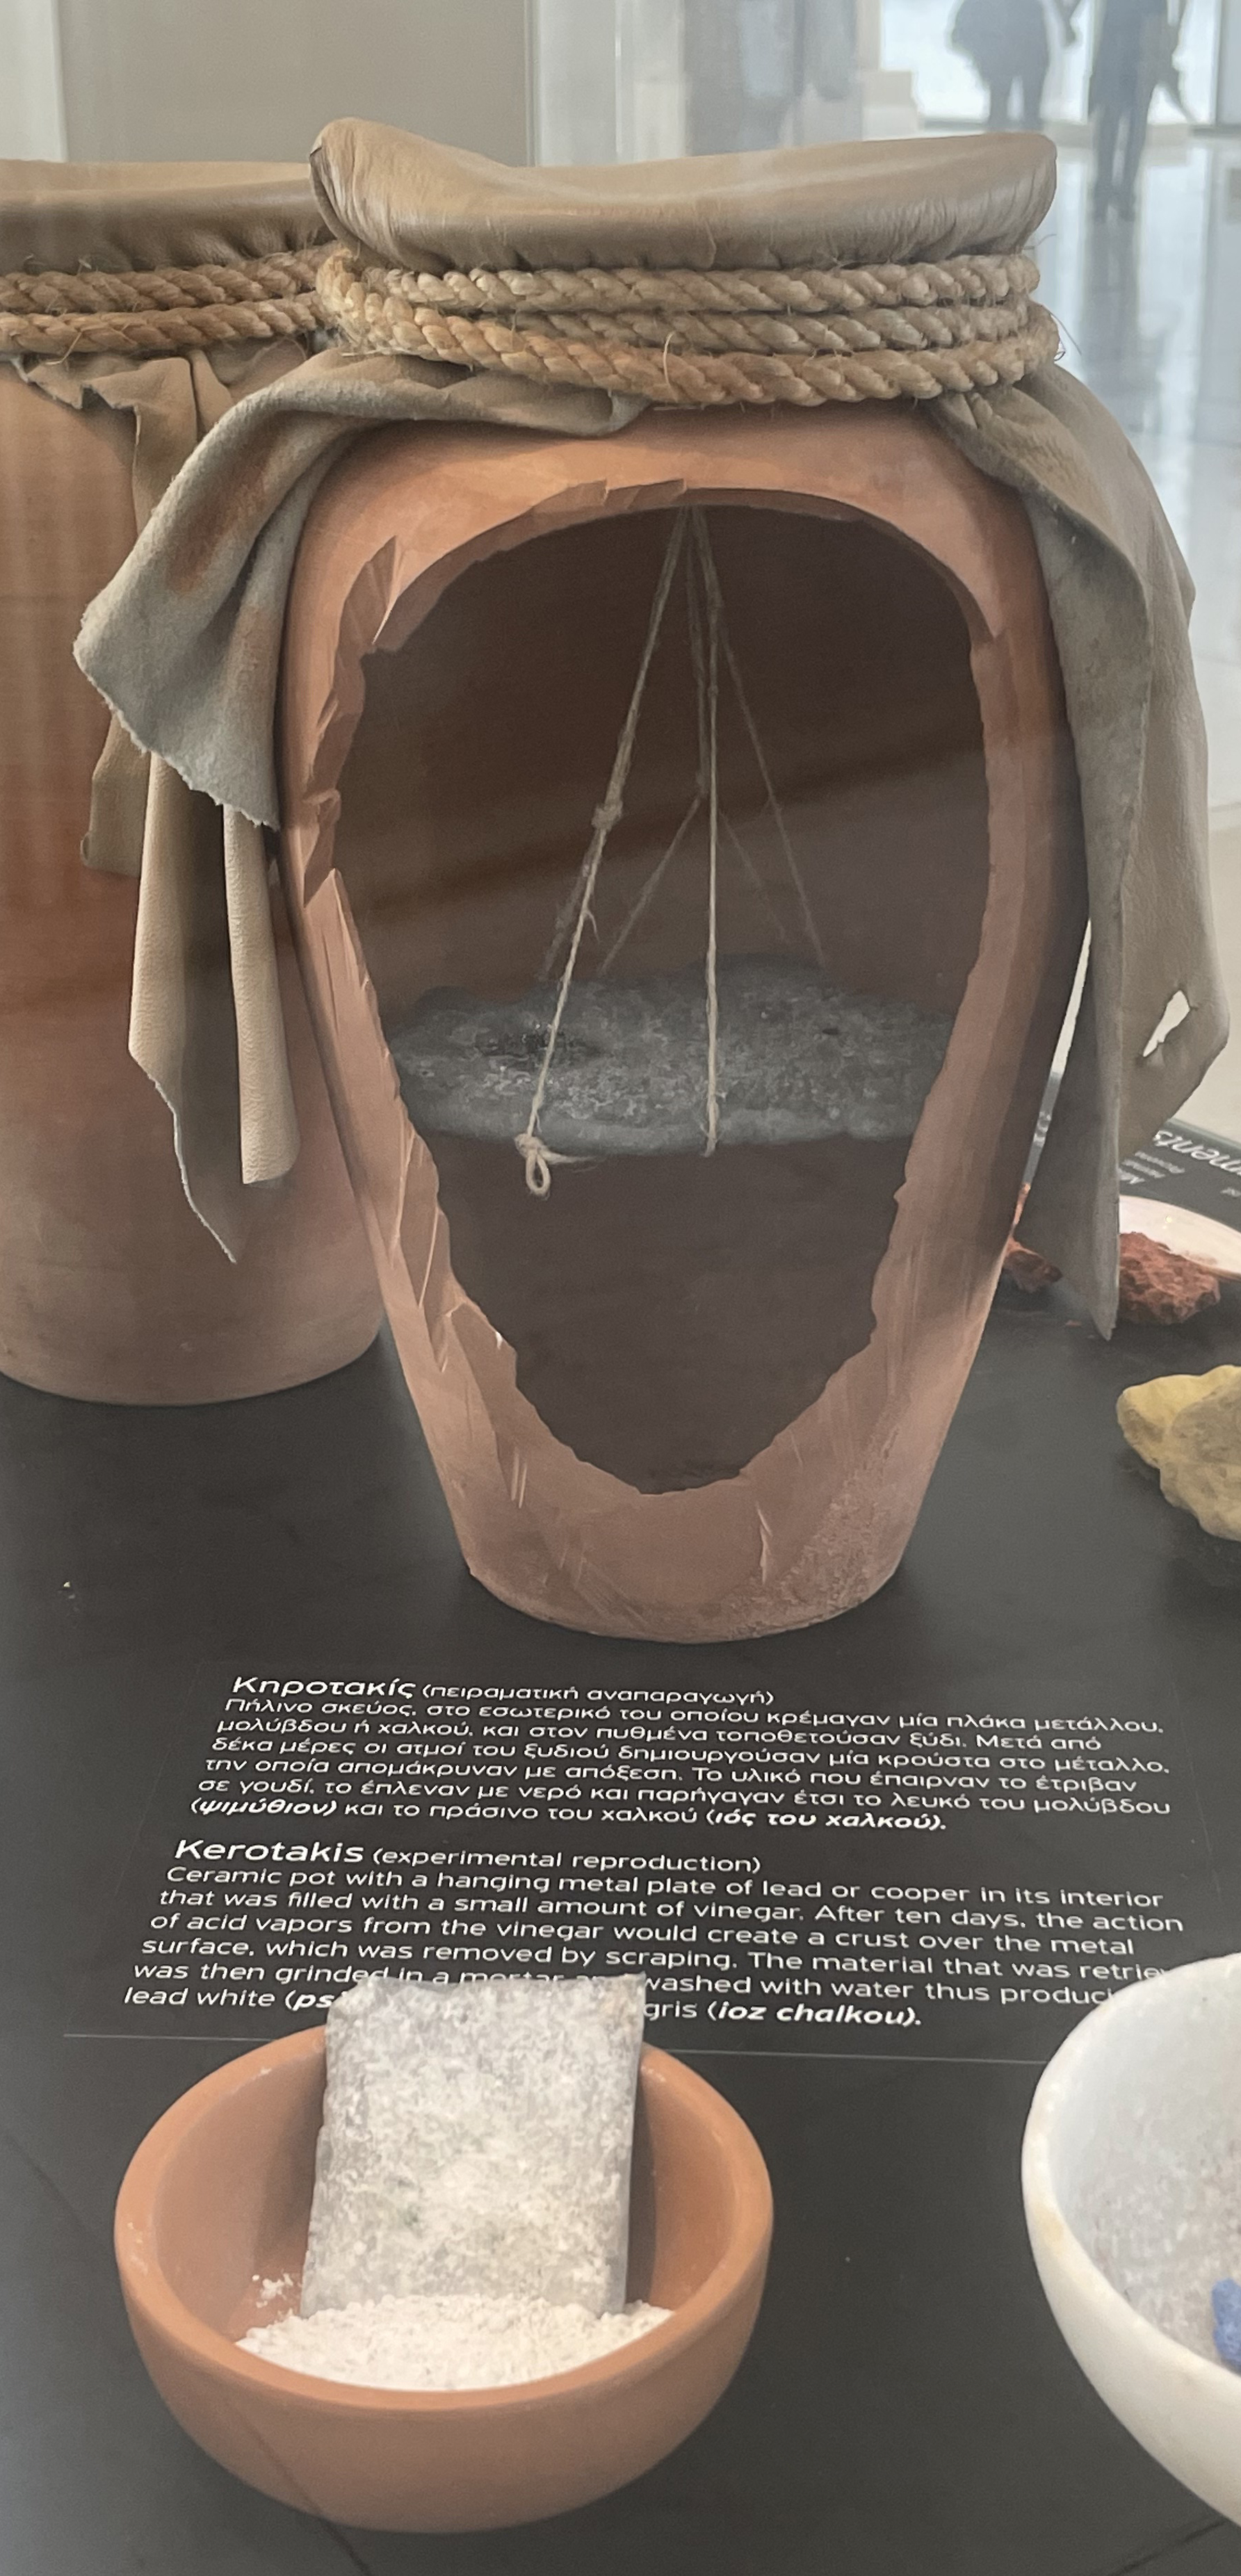
Flake White, another name for Lead White, comes from the flakes the lead sheets decompose into eventually when left in porous clay pots, suspended over vinegar, under fermenting manure. Often many layers of these pots were stacked upon one another, giving the paint another name, Stack Lead White. That astonishing recipe for our most loved white paint pigment goes back to the Roman period. (Verdigris was made in a similar process except that the bluish-green pigment was obtained by corroding copper, not lead. But its name doesn’t reflect that.)
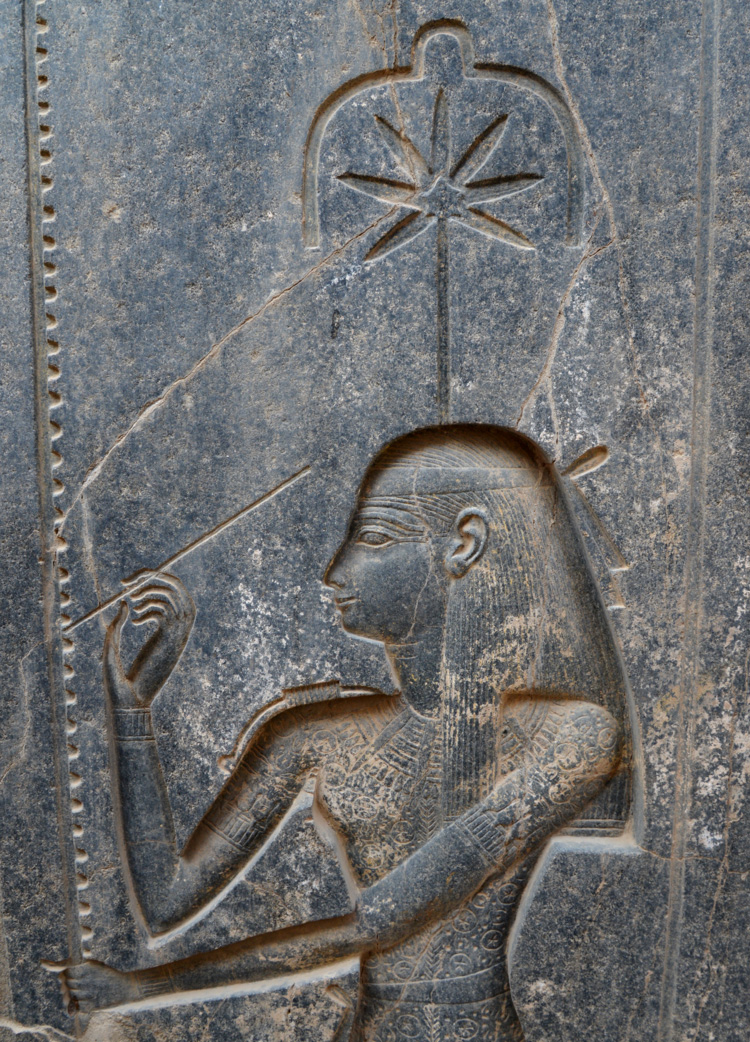
My favourite “process pigment” is a black one, and I’ve had the pleasure of seeing it made in the Kobaien Co. factory in Nara, Japan. Although ink was developed just about everywhere on the globe, at some stage or another, the delightful Seshat, also known as “Mistress of the House of Books”, Egyptian goddess of reading, writing, arithmetic, architecture and credited with inventing writing, might also have (while she was at it!) come up with the recipe for ink. Indeed a most necessary ingredient for the scribes who would for centuries fill papyrus scroll after papyrus scroll with elaborate hieroglyphs drawn in deep black ink.

She might have been the first, but I learnt, at the age of five and in a rather indelible way, that ink comes from China. That’s what the label on that big black bottle I reached for on my parents’ chest of drawers long ago most certainly stated. A very enticing bottle I tried to grab but which leapt out of my hands and ended, without any possible redemption, in a very artistic crash unto my parents’ new wall-to-wall carpet. Encre de Chine is quite impossible to get rid of… precisely why it is sought after so! (By the way, I am talking about the same one you know under the name of Indian ink.)
It is only quite recently that I learnt how Encre de Chine was developed in China in the middle of the 3rd millennium B.C.E., replacing plant dyes and graphite, which had been used for centuries prior but produced, as one can imagine, rather greyish results. The new process consisted of allowing little oil lamps with a conic hat to burn until all the oil had disappeared, the lamp left to cool and the soot collected. That pigment, mixed with melted animal glues, would then be kneaded and beaten until it was smooth and malleable enough to be easily moulded into cakes. Left to dry, the practical little sticks would produce ink-on-demand all over the Empire just by adding water. Maybe because, many moons ago, my tiny hands were in charge of cleaning the soot from the oil lamps every morning in my uncle’s house in the South of France which didn’t have electricity yet—oh those long balmy summer evenings accompanied by the flicker of the lamps— but, for some reason, this process prompted a vivid image in my mind… I could just see the rows of little oil lamps burning, the sooty room in which it all happened, the men in conic hats sweeping the soot gently off the lamps. I anticipated easily finding a drawing or a Japanese woodblock print of this. After all, ink is pretty serious business in China and Japan (which stole the recipe sometime during the seventh century.) But no luck so far…
Still, the day came I got to see it for myself—even if it was a bit hard conveying my bliss at seeing my ‘vision’ come to life to these people who have been producing ink in Nara for four centuries and see it every day in the making. (In fact, I must have sounded positively the stupid foreigner with my over-enthusiastic remarks, but I didn’t care, this was what I’d come to Japan for!)

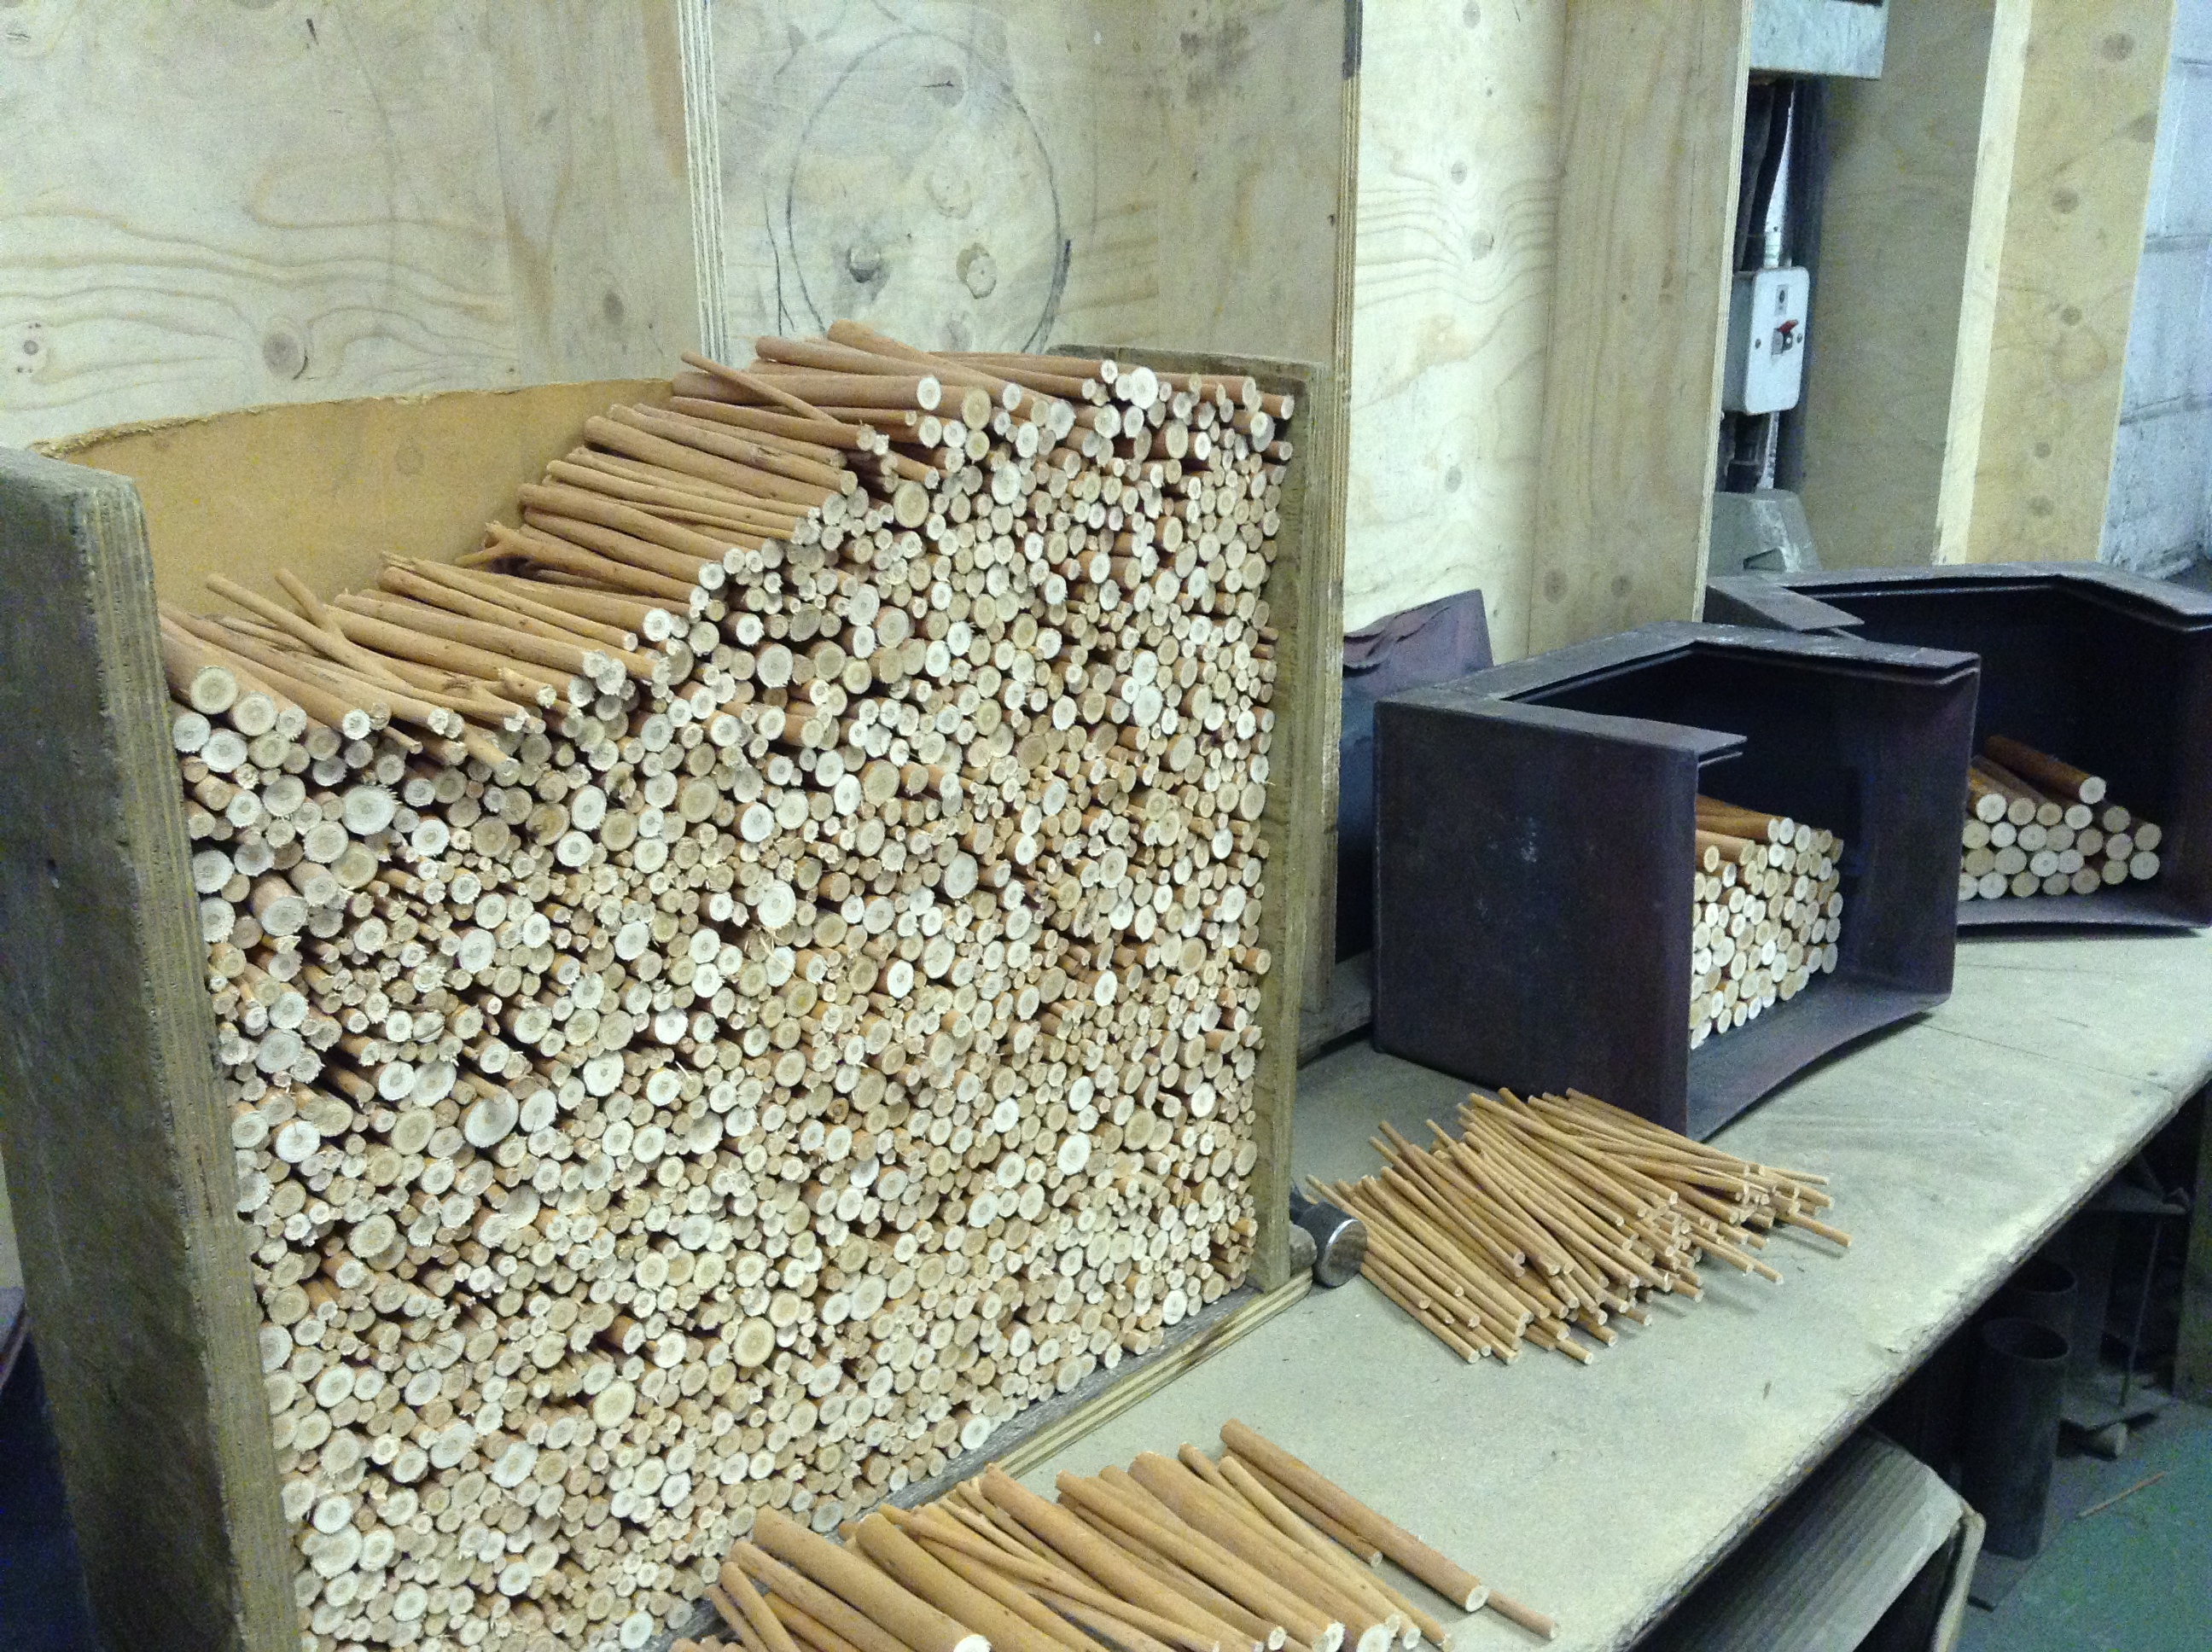
The full recipe is as follows: Step one is the production of soot in the lamps. The longer the wick, the faster the burning, so there is no given time for this, yet it did seem to be a rather long process, and, of course, you need to let the lamp cool before you can scrap off the soot from the little hats.
Step two is melting the animal glues and mixing them with the pigment. In ancient times they used to add a small amount of perfume to cover the strong smell of that binder but I am not certain they still do so.
Step three is kneading the paste you have obtained… feet are definitely an option!
In step four, each lump is weighed, rolled by hand, and then inserted into a wooden mould (the moulds are engraved in reverse so that an inscription can be read later on the stick.)
Step five, buried under layers of rice husk ashes, the little cakes go to dry in big wooden trays. This ash is very very fine (think rice powder) and will absorb already a lot of the humidity.
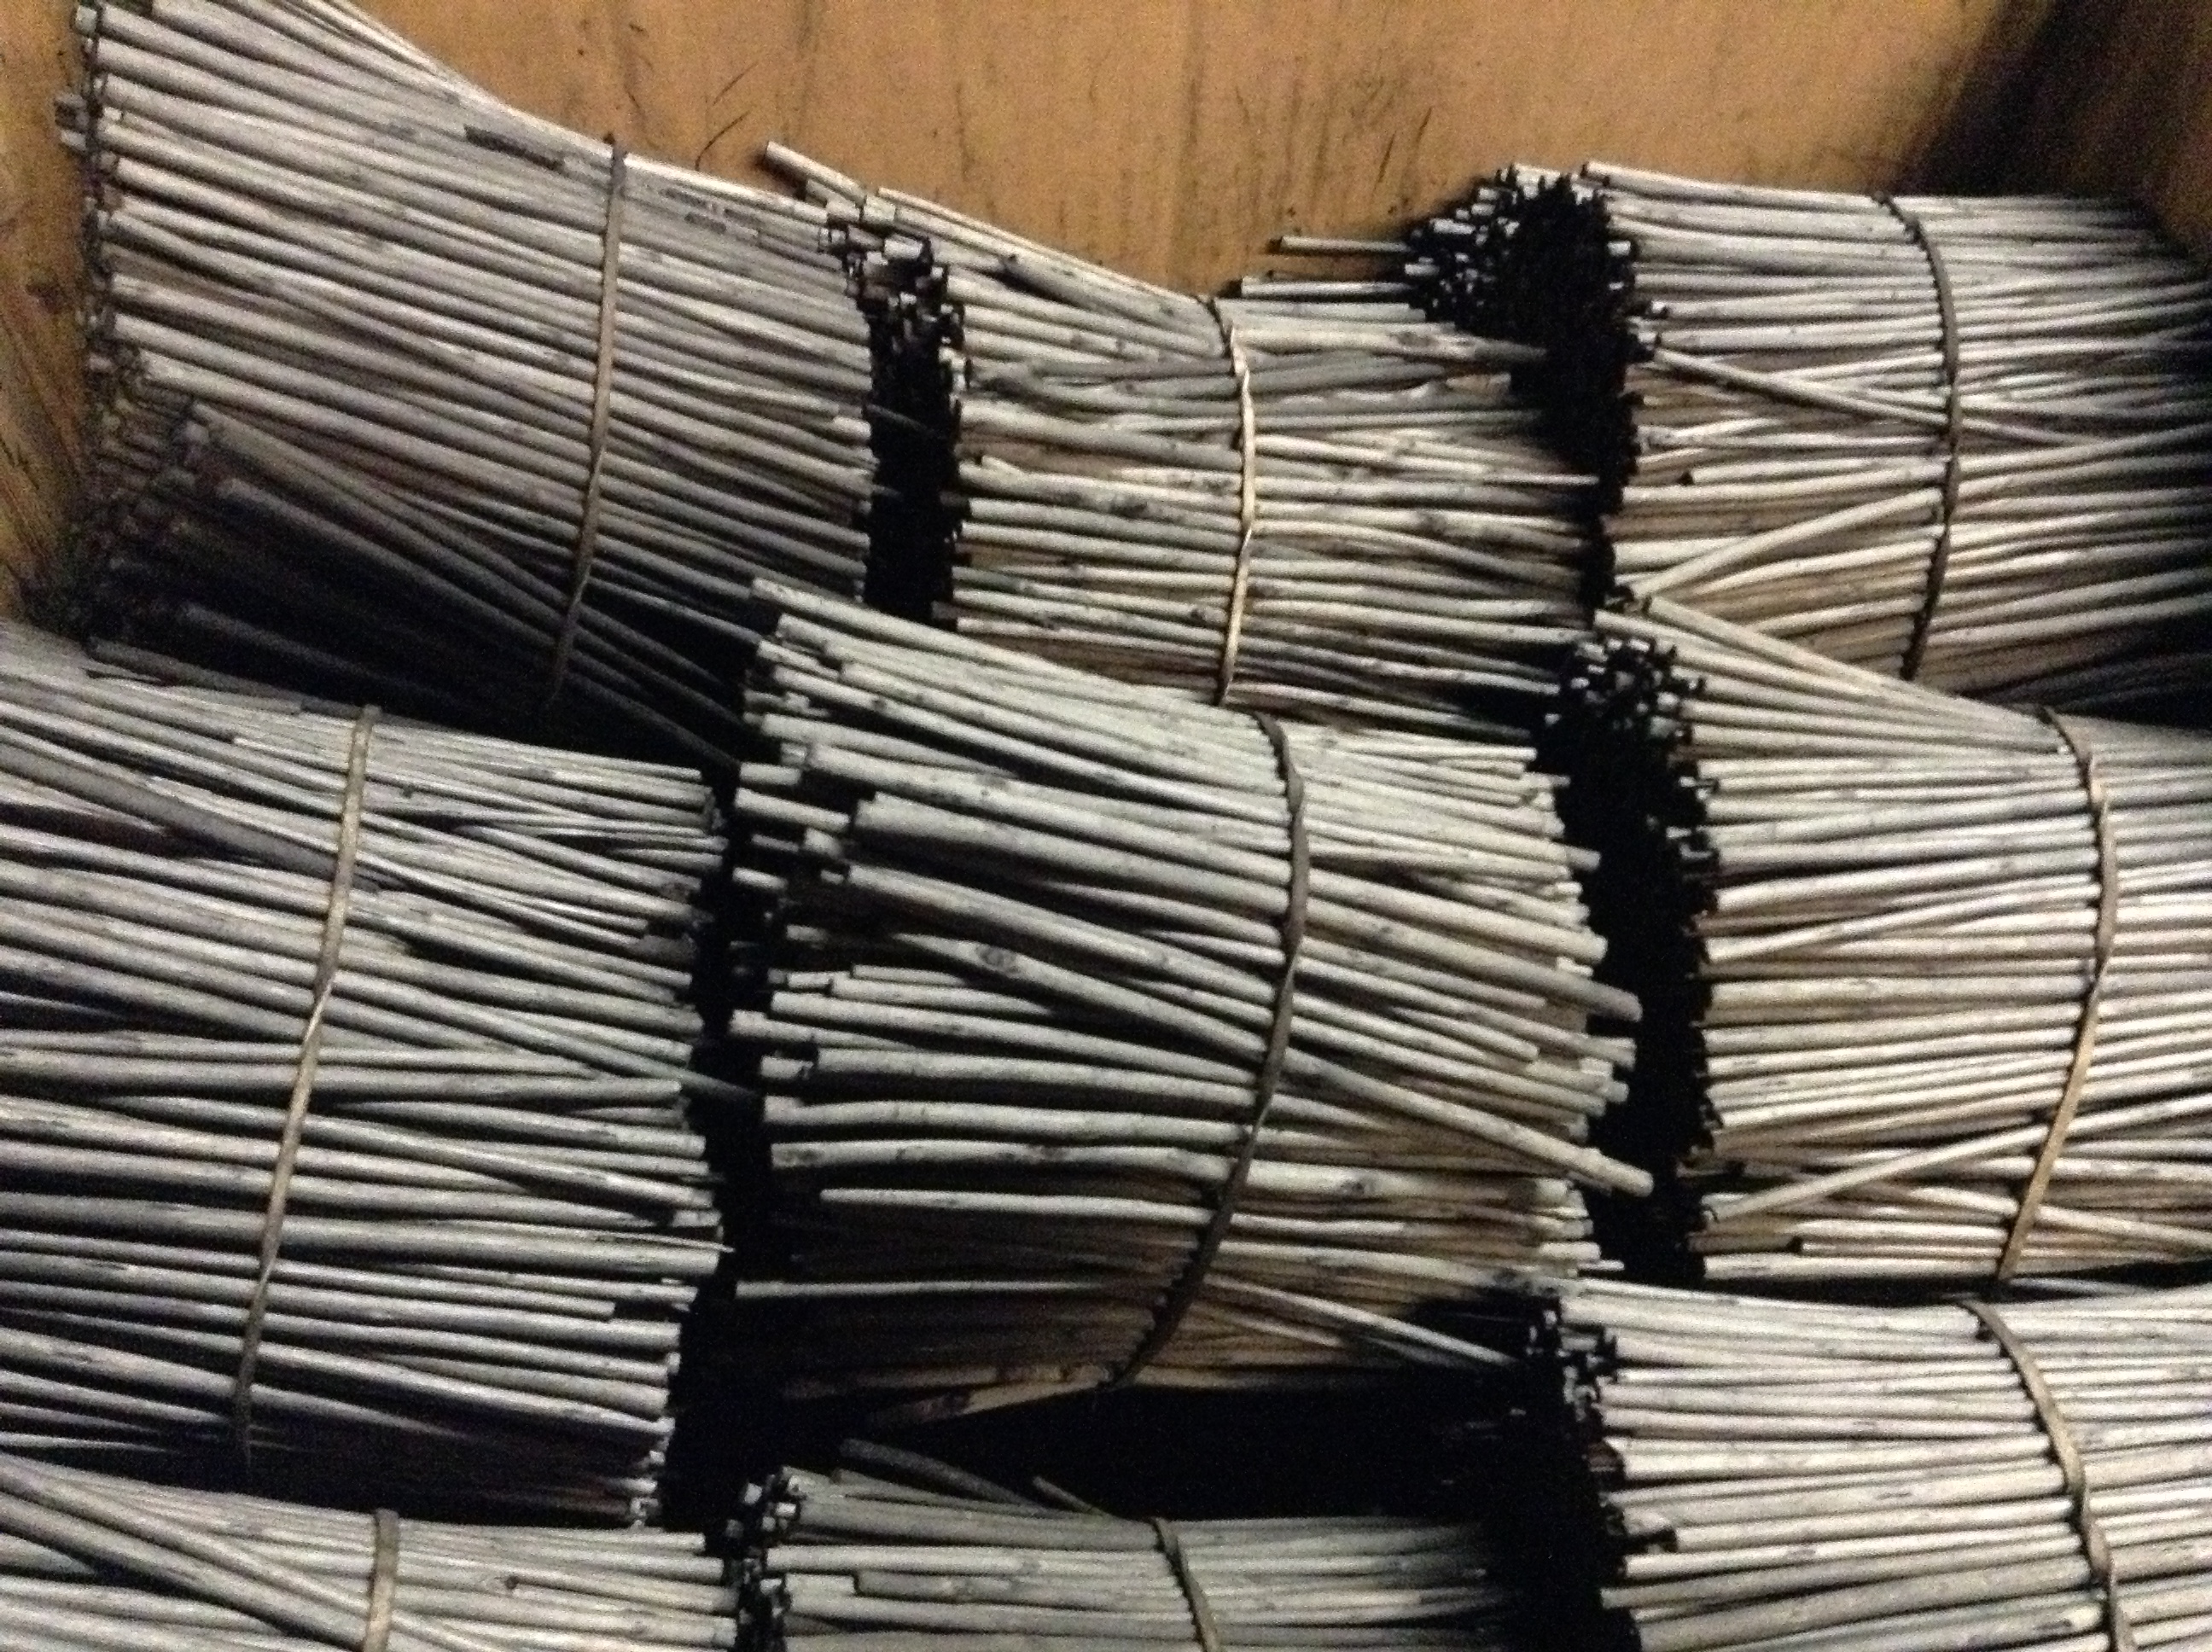
Step six is the second phase of drying, in which neat string-tied rows of sticks will gently sway in an air-controlled room for weeks and become rock hard.
Step seven is shell polishing of the sticks and eventually, for the better inks, hand painting or gilding of the inscription or even the whole stick. (These steps are performed in the summer months in Nara when the humidity halts the ink-making.)2
And which paint bears the name of that ‘process pigment’ made from burning oil in little lamps? Come on, you know… the answer is in the question!
Jump to the next section of the book by clicking here
Alternatively click on the Table of Contents to browse the sections.
You can also subscribe to my blog at the bottom of this page,
and you’ll receive Hues in Tubes in your inbox… as it gets published!
- Intrigued? Go to https://www.livingink.co/algae-black for more info… ↩︎
- You can read the full story of my visit to Kobaien here (and see pictures of each stage of ink making)
↩︎
Discover more from in bed with mona lisa
Subscribe to get the latest posts sent to your email.

One Comment Add yours