Welcome to the wonderful world of plastic paints!
A friend of mine took this photo of artist Dorothy Napangardi dot painting and I’m sharing it here because I love that even one of the oldest art forms, that of the aborigines of Australia, is nowadays using so successfully this most modern of paints to create beautiful abstract art! (Photo © Claire Leimbach)

PS: Before we even start, I’m adding a post scriptum (you might never get to the end of this!) just to say that I’ve resisted for as long as I could writing these pages (and my tech sheet in the shop for even longer) but I have excuses… Firstly because acrylics might seem simple, you know slap-dash-run to the gallery, but are really the most complex of paints and secondly because there are guys out there who have been spending their entire days for decades researching, comparing, pondering, researching some more just on acrylic paints for artists -and there are many more… think paint for planes for example that need to remain stable at -50 degrees Celsius one minute and maybe +50 the next but… we won’t go there now!
Read my posts about my visit to Golden Artist Colors in the US and you’ll understand who I’m in “competition” with but, of course, I’m not even trying. Just to do an honest journalistic sort of rendition is my aim here. But should you doubt the complexity of this, log on to http://www.justpaint.org/ and you’ll see why I feel just this little bit shy to even try…

Acrylic paint first came out some time after WWII. In fact, as early as 1934, the first usable acrylic resin dispersion was developed by German chemical company BASF, then in 1949, Leonard Bocour and Sam Golden came up with a mineral spirit-based acrylic paint under the brand name Magna. Later Sam Golden invented a waterborne acrylic paint they named “Aquatec” but only in 1953 were the first true acrylic emulsions developed. That same year, Jose L. Gutierrez produced Politec Acrylic Artists’ Colors in Mexico and Henry Levinson from Permanent Pigments Co. launched Liquitex colors. These two product lines were the very first artist quality paint similar in composition to was is still in use today.
Soon after the water-based acrylic binders were introduced as house paints, artists and companies alike began to explore the potential of these new binders. Water-soluble artists’ acrylic paints were sold commercially by Liquitex beginning in the 1950s, with modern high-viscosity paints becoming available in the early ’60s. In 1963, Rowney was the first manufacturer to introduce artist’s acrylic paints in Europe, under the brand name “Cryla”.
But poor acrylics! At first, all acrylic paint was accused of being plastic-like or only good enough to paint houses (some amazing artists of course used just that to drip or throw on their canvas around then). Their very simplicity of use was probably what contributed most to their rejection by Serious ARTists… where was the mystique? the need for the professional’s hard-earned knowledge? the months of drying? the addictive smells of turps that gave the atelier its charm? Gone! Gone! Gone!
Alas? Of course not… oils are still alive and flourishing, while the incredible world of acrylics -and its myriad mediums, pastes, gels- is bringing so much to others. (A lot of artists still choose oils for the “cachet”, for the market even but their cutting edge work would in fact be so much easier in acrylics… If you’re contemplating the switch, hopefully this article will tempt you to give acrylics a go, they’ve really come a long way from their cracking, hardening, moulding, stinking début.)

And so, back to the beginning, as ever pigments, our brilliant insoluble particles of colour. Most don’t seem to mind much (on the whole) being thoroughly coated with oil. Yes, some might need a bit more oil than others -as a dry skin might-, these are nicknamed thirsty pigments and some seem to need a bit more coaxing to get us to do with them what we want. Others have issues that need a big arsenal of words like thixotropic vs rheopectic depending on how they react when a force (and believe me a triple mill is quite forceful) is applied to them. Thixotropic pigments show a stiffness because they retract… Azos, arylides, naphtols and cobalts seem to be the worst offenders! Aureolin always seems to expand however and I’ve had quite a few tubes explode in the shop but I have no word for that… yet.
However, when it comes to mixing this aggravating lot with an acrylic binder, some do not like it at all. So the first step is to disperse them in water. But pigments -being the temperamental little things they are- can also be… hydrophobic! So wetting and dispersing agents are mixed with water to get rid of the air which is all around the pigments and allow the water to come in its stead. You see pigments like themselves and flocculate back together in clusters… not only at this stage in the process but even later they might do that so they really have to be torn apart and it can take up to 8 trips in the triple mill rollers (each time tightening the mill) or days battered by ceramic or steel balls to achieve the level of dispersion needed for the facets of each pigment to display -for our eyes only- their glorious colour and luminosity. After that, the battle is nearly won… one more trip in the mill with acrylic binder and they turn into paint! Pffuuu… We call the final product a polymer emulsion (you know, like a mayonnaise is an emulsion) and sure we’ve shaken them a fair bit.


The acrylic binder however is a trip in itself! It’s the stage where you can turn a pigment dispersion into anything from a paste to a ink, so there are obviously quite a few variations on the theme of viscosity alone. But, given these, your base is still an 100% acrylic polymer. Viscosity however is not your only concern… you do not want your paint to mould, do you? Nor foam? Nor dry? Nor turn to cottage cheese? You might transport it from Australia by plane to your residency in Provence and you want your paint to be able to withstand freezing and thawing with no alteration (and it might have to do that trick quite a few times if you think of the trip it has already made from North America to the wholesaler to the shop you bought it in) so… additives are needed. If you want to know more about all the ingredients of acrylic paint, read my post about my visit to the Golden lab.
Later, when you play with that paint, the water added at the start will evaporate and you will be left with pigments trapped into a mesh of polymer -a plastic landscape if you will- in which little hooks are all holding to one another to give you a strong yet flexible paint film (if you have not added tooooo much water that is). That film is generally non-removable from a solid surface… not even that easy on your skin actually!
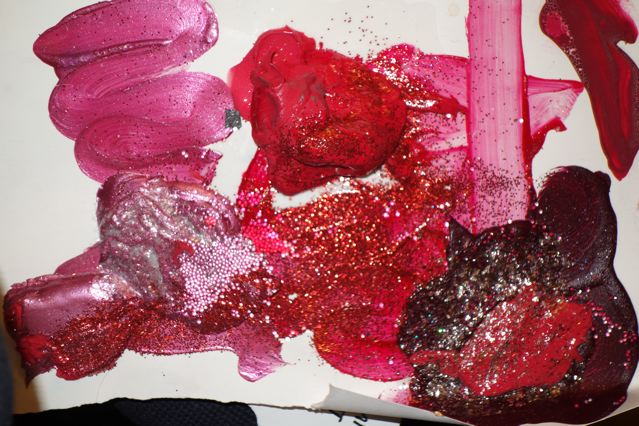
This amazing flexibility allows to you incorporate in the paint film anything from photocopies to sand, to glass beads to glitter to… and make acrylic paint the drug of choice for all mixed media artists. It’s also why so many tubs and jars of medium, additive, paste and gel exist on the shelves. The possibilities are virtually endless and we will explore them in the next section.
But before even adding anything, you must have realized -if you are an acrylic lover or at this stage only a contemplator- that there are many many different acrylic paint options and we will dive into that now. Pigment in water is all very fine but not that sexy yet! It’s that final choice of binder which will make the product anything from a thick paste -something you could extrude like pastry icing say- to a runny wash akin to an ink. If you have read my blog post about my visit to the Guerra Paint and Pigment Corp. you also know that the final mixing into a binder is something you can do yourself. If you wanted to proceed and produce your own paint from dispersions you will have to acquire a binder that produces the paint consistency you are after and I suggest you read that post (you could also get it custom made for you by Golden who offer that service). But if, like most, you are simply happy to get a final product off the shelf then you probably need to learn a bit more about those binders.
The major acrylic companies: Golden, Liquitex, Winsor, Matisse, Atelier etc. have all bent over backwards in the last few decades to bring to the market more and more quality and options. At first there was a lot of trial and error of course and the early results were anything but grandiose (paint cracking, crazing, disintegrating…) but Sam Golden’s motto “Don’t tell me it can’t be done, just let me believe that it can” seems to have been virtually everyone’s motto in the last half century and the results are amazing, giving the artists ever more fluidity, rapidity and freedom in their work practice. Some companies however have gone beyond the call of duty and I am in total awe of the amount of research and testing the company Sam Golden founded does for example…. these guys send samples of their paint to the Arizona desert or to a dirty urban environment like Pittsburgh, just to find out how they will perform there because, of course, you might be painting there too! They also answer thousands of emails and calls, some about your latest crazy idea and how best to get the desired result, and these questions are answered by artists who are all trained a full year… before they are even allowed to answer that phone! I’ve written a whole post about that, so if you have interest, you know what to do!
And so to paints…


Heavy body is the most common viscosity. This paint is gooey (creamy is what the manufacturers call it) thick yet movable without a medium but water helps (not too much or you will loose the full strength of the colour and the integrity of your paint film). Acrylic paint is thixotropic which means that as soon as you hit it with your brush it will feel thinner than it really is but when you stop playing with it, it will slowly retract to its previous heavier bodied form, holding your brush or palette knife marks. Heavy body is obviously going to be your choice if you are into impasto work, used alone or with added gels/pastes for extra peeks and effects. It dries fast but needs a bit more time to thoroughly cure than you would expect, which does not prevent you probably going for the next layer. However beware that full curing can be much longer than touch allows you to believe and I have heard stories of acrylic paintings sticking to one another weeks after they were finished! Yes it was hot/humid and no it isn’t a good idea to leave them front to front even weeks after completion but… sad. All in all they are quite straightforward though and what you would probably “expect” from an acrylic paint.
 I’ll add here a little mention of another “plastic” paint, a vinyl one which I like very much: Flashe from Lefranc Bourgeois. I’ve been playing with these since childhood and they dry to a very smooth matte velvety finish which I like. They have a nice range of colours plus some great fluorescents (including white!) -apart from their finish they behave pretty much like a heavy body acrylic.


The next stage is fluid or soft bodied acrylics. These blob very nicely, you can drip and pour them and they feel like a thinned down version of heavy body paint + water… without the water! So the full strength of the colour is there but the movability is much increased. Being leaner in nature these are less likely to retain your brush strokes, a plus for many artists who look for flatter finishes. As the end result is also more level, these fluid paints might even feel more rich in colour than the heavy bodies. If you are after very transparent glazes these are also your best friends as they mix well even with thin liquids, without foaming… use with moderation as they have tinting power aplenty. In hot weather they dry fast and so beware! But all in all fluid paints are very delightful and useful, great to play with in a journal as you won’t have to wait for ages to turn the page but already a bit too fast drying for Gelli plates for example.


Most recently on the market are the flow acrylics sometimes called high flow. These have the consistency of an ink but if you compare an acrylic ink to them they seem much more pigmented. The binder separates in a way it doesn’t in inks, in short they are still paint, but so very watery (some need a bit of water on the brush to get them going but afterwards they really run). Thinned down flow paints are ideal for washes but used full strength, you can play with them a fair bit (about 1/2 hour), longer than an ink as they have retarder in them for that purpose. They can also be air sprayed with a gun or a propelling device, can go into markers, daubers, mops, even technical pens as fine as 0.5, and offer you the incredible ease of “drawing in paint” with nibs the size and shape you like. The most exciting part I think, is that you can mix them to any colour you want. Most acrylic markers like, say, Posca pens have rather basic colours, cost a fair bit and don’t last that long. The high flow acrylics not only go a long way, will end any nuance you like, be as archival as any other artist paint but also most mixes in your markers are still usable after weeks of neglect (from experience… I speak!). Liquitex offers also ready made artist quality spray paint and markers so you are spoiled for choice… doing it yourself, playing with filling those markers/cans or buying them off the shelves ready made.
Acrylics inks are… not really a paint anymore but of course you can paint with them and a brush the same way you would with a high flow/fluid. These vary in quality from rather basic student brands to really good ones (Liquitex even produces a line on par with its range.) I’ve tried putting them in the same markers as the high flow and it works just fine.


Some companies like Golden or Atelier also offer “interactive” or “open” paints. What those words mean is that you have more time to play with your paint… maybe a week on the palette and a few days on the canvas. They are happy with or even need a little spray to keep them “open” but they are perfect for plein air in the summer, for hot studios, for Gelli plates and/or more extreme conditions. They are also perhaps closer to an oil than acrylic in feel, quite a different animal from your normal acrylic paint in fact. I have helped quite a few artists who could not take the smells of solvents used in oil painting by suggesting Open acrylics. Some like it, some will stick to their oil paints but it’s maybe an avenue to explore if you are not happy anymore. For your underpaint, for fast drying surfaces or really absorbent ones they really do the trick… give them a go!

I would encourage you to buy at least a good quality one from each range, a common colour you are sure to use anyway just to get a feel for each and how beautifully they combine. Because, as long as you stay in a comparable quality, there really isn’t an issue in mixing all of the above. As with any paint though if you mix real bad with good, well, you loose some. If you mix an Open with a heavy body, you will similarly loose some working time but you know what? No big big deal. And of course you can achieve a lot with any range by using additives: retarder, flow release, glazing mediums to modify their behaviour. It’s simply more convenient not to have to mix your paint all the time with a medium. Probably in a way acrylics’ biggest contribution to a painter’s work is not have to think too much about it all when he/she is… in flow precisely!


Some last words of warning…
- Acrylics dry darker in colour than what you see on your canvas while you are painting. That’s because acrylic binders are not transparent (as linseed oil is for example) but a milky white. That added luminosity is perceived by your eyes and shifts the whole spectrum somewhat… when the paint dries and they turn transparent, that white disappears and you will see your colours darker… actually what you see then is the true colour of the pigment… check out the painted swatch on the tube or make your own little chart.
- Most serious companies do not level their pigments in strength, opacity etc. Some pigments are opaque, some are not. Some are glossy, some not. Some are very potent, some not. Reducing all these differences to a similar result is just good for kids or student quality paint (OK I promise I won’t rave once more on the importance of learning with “real” tools but…) In acrylics, some pigments take better to the binder and will accept higher pigment loads. These will dry more opaque and matte. Others will end up more transparent and glossier. One way to get to know the differences in result is simply to “read” the paint swatch on the tube if the company you choose offers that. Another is to decode the label at the back which usually informs you about this. The best is simply to get used to your pigments hands on… knowing all the while though that you can use a medium to control that transparency and sheen and that a varnish will most probably unify the result and so you can always choose later between mat, satin or gloss.
Want to know more? Proceed to any of the next pages about acrylics you have an interest in or… keep reading.
III. h2) Acrylic and Vinyl gessos and grounds
III. h3) Acrylic and Vinyl pastes, gels, mediums and additives
III. h4) Acrylic and Vinyl varnishes
III. h2) Acrylic and Vinyl gessos and grounds
At this stage in our presentations in the shop everyone has glazed eyes and is already somewhat confused by all the paint options so I give them a photocopy of a club sandwich of sorts we invented when doing the very first demo in my shop (probably to be a bit clearer about the whole thing ourselves!). Here it is…
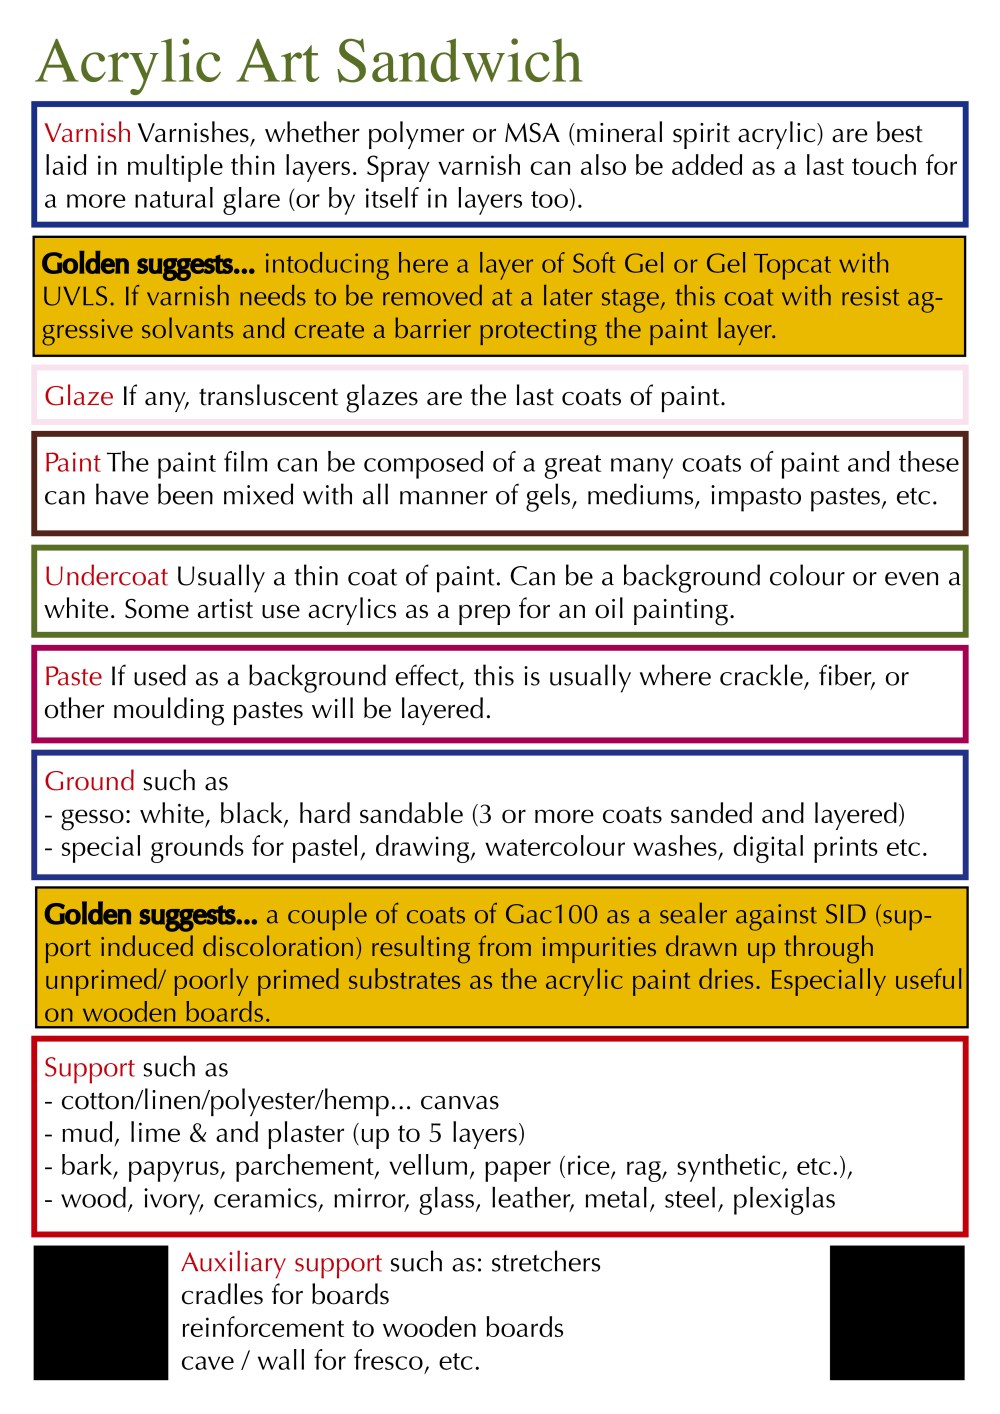
Basically in this section we will concentrate on the three at the bottom. The first one has no impact on your painting proper, it’s just there because without it there would be no second one! Then we enter supports, not the subject of this page but still, these will have a definitive influence on what you need to do next. Most surfaces that you will choose to paint on will need some some of prep… Which is why you should you care about size and gesso. A well prepared surface will give you enough absorption to allow your paint to adhere to your material and, also, by playing with your gesso you can get your surface ready for the kind of work you have in mind… read on… lots of fun options ahead (and we’re not even talking mixed media!)

Fabric supports such as canvas -whether linen, cotton, polycotton, polyester- are probably the most common and there is a fair chance you will, at some stage, buy a stretched canvas or canvas on the roll, that is already primed with gesso…. most probably it will have been triple primed with acrylic gesso (its proper name is not gesso at all by the way but “Acrylic Dispersion Ground” but don’t worry nobody knows or names it like that). If you are happy with the feel of it and know it’s a good quality one you can go ahead and skip this whole section, jump on your paints and go for it! If you are unsure of your primed canvas quality and/or wanted to add one last layer of gesso for good measure while meditating on what you will paint there, do so, it won’t do any harm and, if nothing else, it will save you some paint as poorly primed canvases seem to simply drink the stuff (another reason for buying at least OK quality).
Many artists painting in oils still size then prime raw canvas themselves and rather enjoy that procedure. Years ago it was standard practice at art school to stretch and prepare your canvases and so quite a few still want to do it the traditional way, applying the recipes probably learnt there or taking the short cut to a ready made oil primer on top of their rabbit skin or other hide glue. This is not the way to ground your support for your acrylic paints and, although still sold, it seems that actually animal glues+oil primers are in fact not such a good idea at all… even if you paint in oils… go here for a read if you have an interest.
So, whichever of the following gessos you choose, if you paint in acrylics or any other waterborne paint, prep your support with an acrylic size + acrylic primer (most are). There’s hardly any sense in painting the other side of your canvas is there? Sizing a raw canvas -or any other fabric for that matter- will create a first layer/barrier and is best done by applying one/two coats of Golden’s GAC 100 or a polymer medium such as Matte Medium or Fluid Matte Medium. GAC 200 is also an option if you want more rigidity but must be applied when the temperature is at least 70°F / 21°C. But sizing is not enough. Yes it does what it is meant to do, ie making sure all fibers and threads are sort of pushed back and under control and won’t stick out in your painting later but sizing alone does not provide you with a true ground to paint on. So you now need to put a coat of gesso, then another, then another with light sanding in between each coat (even more coats if you want a less flexible fabric.)
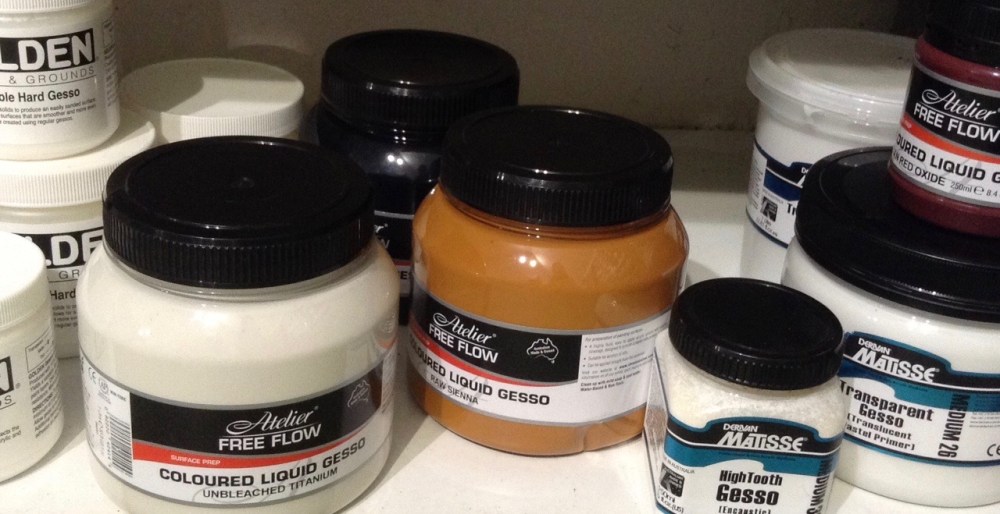
The most common gesso is white from the Titanium white pigment in it but you can use a transparent gesso (or fluid mat medium) if you wanted to keep some of your surface visible. You see more and more raw linen stretched canvas primed in transparent gesso and artists can achieve some lovely effects on these. You can also use a sandable hard gesso in order to smooth it down afterwards or add more tooth by using a gritty primer like Colourfix or any pastel primer. You can use an absorbent ground to increase the natural absorbency of the canvas making it more like paper… great for washes and watercolour effects. You could also use ready-made coloured gesso as a sort of under-under coat or add some colour to your gesso (some artists just paint their pre-primed canvas… white!)
Wooden supports such as painting panels actually do not differ much from sizing + priming raw canvas. You want to first make sure you create a barrier between your gesso/paint and your wood to prevent the terrrrible SID (surface induced discoloration). When your paints dry, they retract and to hold on to the surface they actually pump up that surface… in the case of wood that process can also bring up some of the wood tannin, a problem especially for your lighter colours. GAC 100 does the trick, others will use PVA glue… I leave that one up to you. After it’s dried you can layer your coats of white, transparent or colour gesso onto your wooden support.
Paper/cardboard is of course something you might wish to draw on but also add paint to. There are some ready made “acrylic” or “canvas” paper on which you can jump, also all manners of “mixed-media” paper which will take a fair bit of paint before protesting (ie buckling). All these come in rather smallish sizes so if you want to go bigger (or cheaper perhaps) start with a good quality heavy paper 150+gsm and… on with the gesso. One, two, three coats… a bit of sanding between them, and hey presto your paper is much less absorbent, less flexible and much happier with paint on it. (To prevent bowing of your paper -acrylic paint is after all full of water- you might wish to also size/gesso the back.) You can increase the tooth to help adhesion of pastels, charcoal, pencils by using a gritty primer like Colourfix or any pastel primer. We are still talking fairly lean paint layers here as the weight of impasto paint would probably not be held by paper. AND we are still talking paper here so you will have to frame your artwork at the end in order to protect… the other side! But you know what? It allows you to play at lesser expense… if the result is worth it you frame, if not, in the bin or the folder it goes. Paper is cheaper but more than anything, if you ask me, it is a much much nicer surface than canvas… my taste tis all.
After that you enter the world of “other surfaces”: walls, dibond, plastic, glass, porcelaine, leather, bone, stone… you name it, I think I’ve been asked if and how you can paint on it. Answers will differ too much from situation to situation to go into detail here. It also all depends if it’s for fun or if you intend selling that piece later and thus have conservation in mind. If you are keen for that, scout the Just Paint website and you might find your answers or send an email to the technical support team at Golden they are simply Amazing!
A little addendum about Digital grounds… These are available to prepare your paper (or virtually anything you can get through your printer) to receive the ink-jet inks and better preserve your print from fading. A print you might never even paint on, it might be your finished piece… or you might collage/fuse it into a piece. So although it has the same name and use as “ground” it might not quite sit in the same place in the art sandwich.
PAINTS – h) Acrylic and Vinyl: 3. Pastes, Gels, Mediums & Additives

Now don’t panic… I know, I know, there are SOOOO MANY bottles, tubs and pots out there, it can really be a bit daunting. First of all, you don’t need them all! Actually, you can do without them altogether it you want (but it would be sad because this, precisely, is where acrylics take their revenge on oils and other paints as thanks to these you can make your paint do almost ANYthing!). Also, quite a few cross over into other products and their possibilities so you will NEVER need them ALL! Breathe… read on…

I’ve put the pastes first in this section because they are the closest thing to a ground (you can actually substitute a paste for your last layer of gesso). Being filled with marble dust, diatomite (a crushed rock close to pumice) or clays, pastes dry to an opaque white or clay-tone finish. As a result you tend to put them on first… but you can mix paint in them and they with dry opaque and colourful! These all do something quite precise.
- Moulding paste is the one offered by most companies (with sometimes variations of Light, Regular, Coarse and Hard) and, mixed with paint, is ideal for building layers and thick textures without the weight of gels. But there is no need for colour at all… You can invent a whole landscape then simply paint over the 3D dried moulding paste.
- Fibre paste is beautiful in itself but also very absorbent, giving you a feel akin to paper… a great ground for washes.
- Crackle paste is the ultimate fun one though as it produces some really fab effects… you have to be a bit patient with this one as it often needs an overnight time to produce the cracks and have to be a bit generous too because it you lay it too thin it doesn’t crack much I’ve found.
Then come the thick, jelly-like gels, these are like colourless paint and dry transparent. If you choose to add some to alter the consistency of your paint (from pourable to highly solid) you can nearly divide the selection of gels by three as they virtually all come in Matte, Satin and Gloss. Choose your sheen, the heaviness of your gel and then concentrate on what you want that gel to do for you…

- Regular gel is on par with the heavy body paint so if you mix it in your paint it will extend it or add more transparency without changing much the paint’s viscosity.
- Heavy/Extra heavy/ High solid gels are thicker and these variations help you hold peaks, build more surface and retain deeper brush or palette knife strokes.
- Some gels have little “things” in them: beady, grainy, flaky, shiny bits that will give texture and substance. These are not for every one but can add really cool effects.
- Pumice gels add tooth: fine to create a good drawing ground, coarse and extra coarse to turn that road in your painting into a proper gritty one!
- Self Leveling gel, when added, produces an even (very glossy!) paint film which helps level other products.
- Clear Tar gel has a stringy quality which allows you to drip fine lines on your surface rather than blobs.
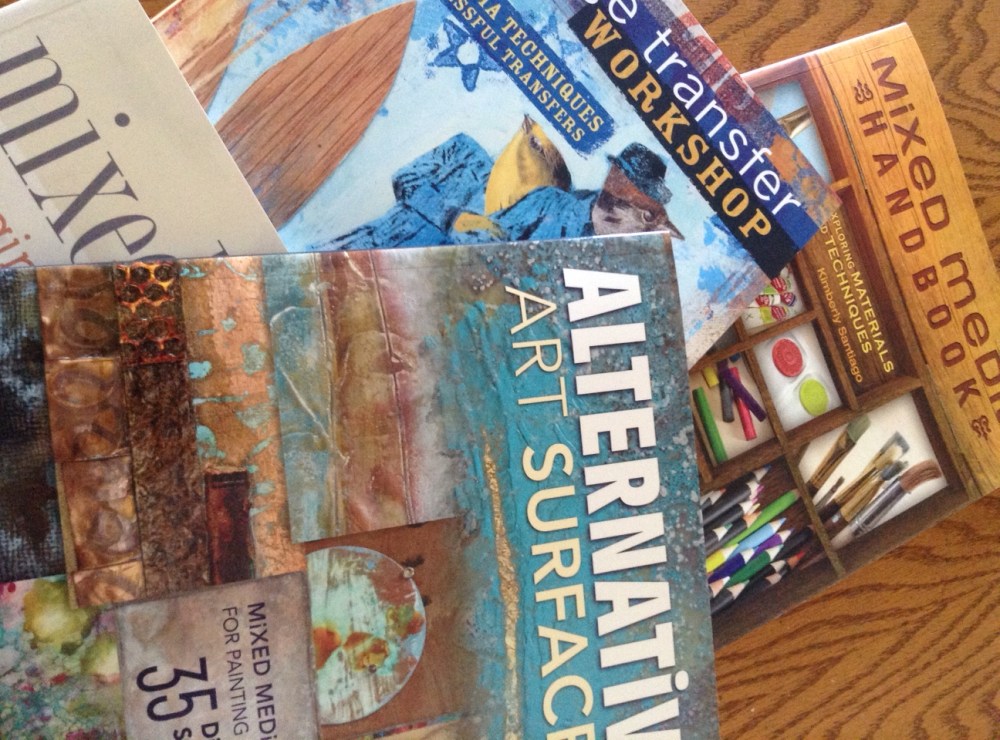
Getting to play with pastes and gels during a demo as we facilitate in my shop (and most probably elsewhere) is usually the best way to try them as it can be a bit dear to buy the whole collection and I would doubt they will all be to your taste anyway. Many shop assistants don’t really know them in depth either but a good way, if demos are not offered in your area, is to watch online videos (there are literally hundreds out there), there are also some great books showing you step by step how to achieve a specific outcome. Once you’ve selected a few you like the results of, invest in them with some friends and have your own show and tell day… fun! (Make sample boards to remember what’s what later.)

Finally, the transparent drying mediums /additives are very similar in their range to the mediums used with oil paint and you will probably be happy to own quite a few of these. Depending on the one you pick they extend the paint without losing the intensity of your colour, give you more time to play with your paint, release flow, turn your paint into glazes, alter the sheen or transparency of your paint too and often combine more than one of the above qualities. Although you can’t use one instead of another -a retarder and a flow release are not going to do the same job- I suspect you’ll probably get quite a range over time for different works or stages in your work.
- Gloss medium will extend your colours, helping you make all your pigments glossy (remember they aren’t all naturally so) and more transparent. Adding this will give you more flow and give a more rounded finish.
- Matte medium will also extend your colours but obviously will make all your colours more matte! It can also be used as a clear ground (or gesso) and matte medium is the ultimate glue for collage. If you are playing with fluid paints, choose fluid matte medium. If you want an even ‘matter’ result, choose the super loaded matte medium.
- Glazing medium (not available in matte obviously but often both in gloss and satin) helps you create beautiful rich glazes resembling those people rave about in oils.
- Retarder will give you more time to play with your paint.
- Flow release will turn them into fluids to high flows.
Some companies offer even more variations in acrylic polymer which will do very specific things… some of these increase hardness or decrease crazing in your paint film, some help seal your porous surfaces, some stiffen the textiles you might choose to paint on, while…
- Airbrush, silkscreen, fabric, iridescent mediums turn your normal paints into these specialty paints (saving you a fair bit if you only need them once in a while!)
You might not be into mixed media at all, you might not want to turn your studio into a lab either and, as I said at the beginning of this section, you don’t need any of the above but… they are all there if you want them!
Which is quite amazing if you think about it…

PAINTS – h) Acrylic and Vinyl: 4. Varnishes
80% of the thousands of questions the Golden material specialists team receive every year are about… varnishes! So let’s just be clear right from the start, I will not be able to give all the answers here you might need. Hopefully though this will give you a better theoretical understanding of them and then… practice will be up to you anyway!
Sarah Sands, the head of the materials team at Golden, thinks it’s because varnishes not only come on top of your painting (and by that she also means the last layer is often left to the last minute) but also late in your career even! How’s that so? Well at art school -if you went- they probably taught you that varnishing oils was a must but… acrylics… no, not really. Until that is you have your first big show/reputable gallery and you begin to wonder: “Maybe, now that my paintings are worth a bit, I should protect them and varnish them?” At that stage the photographer is booked for next week, you rush to buy the first bottle you see on the shelf and do an awful job of it! The product can’t do it all… as you’ve probably noticed in other areas of your artistic journey! Practice at varnishing will make it perfect and some artists, yes, get this impeccable smooth matte surface but it’s not the varnish which should be admired but the varnisher… presumably, in that case, someone with years of obsessive skill development and control of conditions / materials.
Don’t panic… you will get the hang an acceptable result soon enough and most varnishes will be fine for acrylic paints. Also, there are so many options available that, in truth, it’s a bit criminal to miss this last stage in your painting! Why bother at all? Well, because you don’t know what destiny your artwork will have… it may end up over a chimney, in a smoker’s home, rain may leak from that ceiling over it or heavens forbids someone trips, it drops and the surface gets scratched, etc… you get it. Varnish is a final layer (harder than paint) that truly coats and protects your artwork. It will bare the first brunts and, if any of the above happens, a restorer (or your good self) can remove the varnish and, when the painting is cleaned or restored, reapply coats of varnish on top of it… good as new!
IF you really want to drive out of business half the restorers in the museums… add an isolation coat before you go to varnishing proper. This permanent, non-removable coat will totally protect your paint film if / when the varnish has to be removed. It also seals in the painting, making varnishing an easier job. Please practice on unimportant works as this procedure is tricky, non-reversible, and can alter a bit the ‘feel’ of your painting… if you hate it… skip it!
Isolating mediums exists for oil paints too but that’s another story. On acrylic paintings, if you want to brush the isolation coat (not so easy to do on impasto work or mixed media works with bits in them) dilute Golden’s Soft Gel gloss by adding 50%+ water to the gel. If you want to spray a 2:1 mixture of Golden GAC-500 to Transparent Airbrush Extender can be applied with an airbrush or spray unit. One to two coats are enough (except on very absorbent surfaces when you only stop when a satin surface has been achieved… this is vital before applying a matte varnish on that absorbent surface as it might “cloud” or “frost”). Let each coat dry six hours for good measure -if it’s still tacky a bit longer- and a full 24 hours before varnishing proper.

When can you begin this process? You can apply your isolation (or varnish) coats just a few days after finishing your painting… it’s really one of the major advantages of acrylic paint. If you are in a very humid environment or if you have thick layers… give it as much time as you can afford but never stack your paintings and certainly never front to front as in fresh paint our still active friends (the little polymer hooks) will only be too happy to grab their friends on the other painting and stick together… You can’t blame THEM, they know no better… but now YOU know. Allow yourself enough time however because all these layers will take some days to dry and you do need to let your final varnish layer cure several more days before packing and transporting… and, it hopefully goes without saying, but I’ll say it anyway… do not repaint on your varnish.
OK! Varnishing… breathe deeply. There are three ways to go about this… applying with a cloth (wax varnish only), brushing or spraying (forget sponges, rollers etc… they leave holes in the film, produce uneven coats and… too long, just forget them.)
If you choose the brush, you have a further choice to make between Polymer/Polyurethane varnishes (strictly for acrylics) or Mineral Spirit / Solvent based varnishes (those are also suitable for oils and paints). Sprays on the shelves are all solvent based. These options come in Gloss, Satin or Matte (except wax varnish which is matte but can be buffed to a satin sheen), but note that satin and matte varnishes will lighten the appearance of your darker colours.

Water-based Polymer Varnishes resemble a liquid gel but are harder than a normal paint film. Still they are not formulated to protect anything that you touch often (a chair, a table) or for anything that will go outdoors even if a UV protection is included in the varnish. Depending on the company, these varnishes sometimes have to be thinned (as matting agents tend to sink to the bottom.) Thinning has the advantage of releasing any foaming but is a bit boring to do… follow instructions given. You can usually also spray this varnish but I don’t think you can buy it ready-made… again, follow instructions.
Water-based Polyurethane Varnishes are harder wearing than the polymer ones but are not flexible enough for use on canvas… they are best used on boards, wood, etc. and should not be diluted.

Solvent-based Varnishes are made of acrylic resin dissolved in mineral turps/spirits. These tend to have a more WOW effect in gloss than above products as they refract the light better (a final coat of gloss spray varnish further emphasizes the trick too). They are also harder, less foamy and tacky if slightly less flexible, but suitable for use on canvas. All varnishes dry clear of course but as these are clear from the start, they are also a bit easier to apply. As each and every brand has their own formulation, it is best to follow instructions on the label regarding ratios and thinners but… most brands do make you work a bit! The same product used for thinning should also remove that varnish.
If thinning is not necessary…. shake well (especially Satin and Matte) before use as the matting agents go to the bottom of the jar.
Hard Solvent-based Varnishes are for murals and other outdoor applications, they usually have a UV protection added and behave more or less like above solvent based varnishes… follow instructions on the labels though.

Brush application takes some practice, as said above, and testing is recommended too. Dedicate a good quality, soft, lean flat brush to varnishing alone (you don’t want to have to pick up a stray bristle in that tacky film and probably you’ll only see it too late anyway). The brush size will depend on your work’s size of course but as big as you can handle with ease. If your work is small enough to varnish flat, this will avoid potential drips (although you should never have that much varnish on your brush in the first place) but held tight in the cradles of an easel might be easier. For rather big ones your arm may not extend to the centre of your artwork and so… no choice except spraying of course or a scaffolding as in museums! For really 3D pieces go with spray to avoid very slow drying in the pools of varnish that will form in the cracks, the nooks and crannies of objects, etc.
A shallow dish, dip only half your brush in it and on you go… not at the top left corner (as all of us seem to do automatically because that’s where we begin a page I think) because if you begin there you are far from the other side and it’s hard to pull your varnish across the surface and it’s also too close to the edge of that corner to do a cool job as it will leave too much varnish in that spot. Divide mentally your canvas in squares you can manage with your brush without over stretching, apply a few crosses of varnish in each sector, then pull the varnish along and to the sides going all the way out. When done, unify it by slow systematic sweeps one way and in the same direction then the other way, also in the same direction. After that open a bottle of nice wine and put your feet up… while it dries thoroughly. You’ve done your first coat, it’s time to celebrate… but don’t get too drunk, you can apply another coat in about 3 to 6 hours! And two coats usually does the job.

Spray application begins with two full minutes of rock and roll (or twist or Charleston… you choose). Basically your can of needs to be shaken, baby… so why not shake along!
In an ideal world you can do this outdoors on a windless day, as microscopic particles of tacky, invisible resin are only too easily breathed in and stay in your lungs forever, otherwise a paper mask and good ventilation should do the trick. After the shake, a good varnish will flow like a breeze through that nozzle BUT (just in case) always begin your spraying outside of your painting and, when you are confident it’s delivering an even spray, go for it one way, then the other… evenly, thoroughly, then wait a few hours… rock n’ roll some more and start again. Until you’re happy with the result and feel you have an even, serious coat of varnish on (3? 4 times?… these coats are much thinner than brush applied ones). PS: there are some archival spray varnishes (with UVLS) out there so if you really like this better it is totally a safe option just… buy the right one!)
Complications do happen! Apart from the obvious ones… room temperature too high/low, product faulty/too old, brush hairs embedded in varnish… yes, you can also end up with milky films, a bubbly film and a few other scenarios I will not share with you as you might give up on varnishing altogether. When in doubt or in a crisis call your supplier and by that I mean the people who make the product rather than your shop and discuss the issues. There are too many variables to answer all of these here. Usually they are concerned and helpful. They also know their products best.
Clean brushes, trays, spray nozzles,etc. as soon as you are done. Polymer varnish when still wet can be removed with water (50-50 ammonia /water after that). Solvent based ones with mineral spirits or recommended solvent
How to remove varnish? In truth, you don’t really want to be the one removing your varnish… best left to a restorer with a mask, the adequate equipment etc. But will I convince you? probably not so… polymer varnishes can be removed with household ammonia (avoid ammonia with a scent added or varieties that may contain soap) and mineral spirit varnishes with a solvent. If you want to stay in a range, some offer that too (Golden has an MSA Solvent for example). Other companies should let you know on their labels what to use: turps, white spirit, etc.
There are other methods I’m sure but I’ll give you the one I know… Test an invisible area if possible and go gently with tight cotton buds on an angle in little circular motions (make them yourself by wrapping loose cotton on a stick as you will go through a lot). Punch a whole in the lid of a jam jar to drop your soiled buds… it will be less intoxicating! You will soon get a feel for when to stop as when you hit the paint film proper with your harsh solvent it will move it a bit. I’ve seen my mother -who was an art restorer- do this for hours on end so letting you know too that patience is a vital ingredient!!
Varnishes yellow in time don’t they? Yeees and no. Probably not in your life time if you’ve used a good product and the artwork is treated reasonably well… so I wouldn’t worry too much. Also, that’s what varnishes are for. They collect dust, they yellow… you clean the ‘painting’ (the varnish actually) or remove the varnish and reapply… done!
