When the word ART is mentioned, I would bet that in most people’s minds what pops up is a painting and, most probably, an oil painting. Which is pretty normal since for six long centuries, oil painting reigned unchallenged either technically or in terms of prestige on the Western visual art scene.
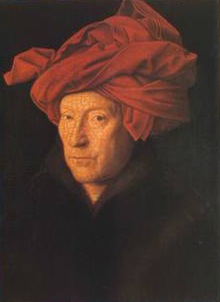
If you want to know more about its long history maybe have a read of my binder section but the short version is that Van Eyck, early in the 15th century, would be its inventor (a fact much debated). But in oil paint he certainly painted and, what I do find amusing is that, he lived and worked in Bruges most of his life, an area of Belgium where flax, also know as linen, is grown. This modest blue flowered plant does not stop at offering the oil of its seeds to painters as their favorite binder and medium, it also gives its soft fibers to be turned into the support of choice for oil painting. Basically bringing down to two ingredients the whole process : pigments + linseed oil on linen canvas!
Yes, over the centuries many other oils were tried and rejected, while poppy seed is also used in some ranges still for the lighter colours as linseed does tend to yellow a bit (much less these days in which stand oil –a sub-product generated by heating linseed oil for a few days at near 300°c– has mostly replaced the cold pressed linseed oil in the good brands) but all in all, linseed oil and linen are still a traditional painter’s best friend.
If you want to know more about how oil paint is made, you might wish to read about a visit I made at Blockx, at Langridge or an interview with David Coles I made. Basically though each pigment particle is thinly but thoroughly coated in the oil and this process is what will give the colours their incredible luminosity, depth and unsurpassed brilliance. This coating with a ‘drying oil’ does not evaporate but oxidizes in contact with air. Over time, it becomes touch dry then, months later, dry enough to be sealed with a permanent varnish but actually an oil never really dries, so a painting in which oil was used both as binder and vehicle we now know never really dries either… even centuries after it was painted ! (If you do not believe me… read this great article by Sarah Sands in issue 25 of Just Paint, Golden’s newsletter)
Obviously painting in oil does have rules which are stricter than the acrylic ones but they are a small price to pay for the delight of the result and, in truth, are pretty simple to follow :
DO NOT…
paint a faster drying paint film over a slower drying paint film (the famous fat on lean principle). You obviously need your first layer(s) to be dry before you apply the next one(s). If the layer is very ’fat’ it will take ages to oxidize/dry. So, unless you are VERY patient, paint lean first or even paint your background layer(s) in acrylic… that’s totally OK. (Part and parcel of this rule is that, obviously but perhaps best repeated, you do not paint in acrylics which are fast drying over oils either.) If this rule is not respected, expect cracking and shriveling of your upper most paint layers… not fun, not pretty !
use too much thinner. If you do this you will strip the pigments of their protective oil coating which will result in a poor paint film unable to hold the pigments together. Sooner or later, that film will crack. Finding a good ratio of oil and turps (whether it be gum turps, artist’, citrus or odourless products) to produce your medium is, obviously a number 1 concern. You can buy these ready made, or you can master that art yourself. (Out of interest I have compared once the price of adding the two products vs buying a ready made medium and they are virtually on par, so it comes down more to your pleasure really.) What is sure however is that it is really silly to buy expensive paints and thin them down profusely. Believe me, oil paint companies work pretty hard on finding that perfect balance for each pigment in their range… destroying it with cheap thinner is really a waste of your money and produces poor results with more problems down the track.
Furthermore, if you do not work a la prima, ie not completing your painting in one sitting, you will need to find your perfect ratio at every stage of your painting in order to respect your fat on lean principle. The ratio needs enough solvent for thinning and enough oil to maintain the integrity of the film but the first layers will require a more turpsy ratio to help a fluid underpainting and enhance drying. Then a more viscous balance is needed for your top layers. You might wish a fattier balance still where even more oil is used with little solvent to be compatible with impasto work, or in the last glazing stages.
varnish before complete oxidation has occurred. This is a very common mistake and not such an easy one to avoid as a painting might feel dry to the touch and fool you or you might simply want to show it in your next show and go for it ! (Just for fun did you know the French word for an art opening is « vernissage » which comes from « vernis », ie varnish, the fatal last day to give your final coat to your artwork even then it seems !) In truth, and depending on where you live and your weather conditions, six months is a minimum and a year is on the safe side. If you must show it, best to leave it unvarnished but tell your patron the work comes with a varnishing session further down the track – if that is an option. To finalize the look of your painting though and give it that unifying gloss coat, you can apply a coat of retouching varnish as this product will not seal the surface of the painting and cut off the oxygen supply, allowing it to finish its process in peace… don’t forget to come back to it later though as not varnishing is in truth not a great idea. Only that final varnish and its resin coating will fully protect your artwork from dust, dirt, smoke etc. If, at a later stage, it needs to be cleaned it can also be fully removed and reapplied without touching the paint film.
Quality
Three grades of oil paint exist on the market:
artist (finest, extra fine, super fine), professional (fine) and student

Judge for yourself… what are you paying for? My first answer would be that an art store is probably one of the very very few places left on this planet where you still get your money’s worth… trust me it is true ! If a paint is worth twice the price of another, it has far far more pigment, better quality oil, a longer milling time for the pigments that need it, etc. and will take you much further down the track (with more delight) than the cheaper one.
Some clients try but it is virtually impossible to compare paints in a store. Unless it is the exact same pigment in the exact same tube size, you cannot tell them apart by weight as some pigments are heavy and some not, nor can you because some have a stronger tinting strength as some pigments are naturally more tinting than others etc. etc. So, until you take it home and try it for yourself, you will have to go by the reputation of the paint maker… (but I could whisper in your ears at this stage -and in alphabetical order- Blockx, Gamblin, Michael Harding, Langridge, Lefranc, Maimeri, Old Holland, Rembrandt, Schmincke, Williamsburg, Winsor & Newton)
Artist grade paints are usually made with only the purest, highest quality ingredients and manufactured without regard to cost. Each company might have a slightly different approach to making their paint, choosing their color lines, different pigments providers but overall they have at heart to provide a paint consistent with their hard-earned reputation and consistent with their last batch of the same colour. (Some, recently, have been slightly abusing their good names I find and are producing lesser quality ranges which are virtually impossible to tell apart from their artist one… cheaper, of course cheaper, but a bit annoying.) A line of artist grade paints usually includes traditional and modern pigments, and the range will predominately be composed of mono-pigment paints. Depending on the pigment (some are thirsty !) each colour will contain more or less oil but in an artist range pigment concentration can reach as high as 75%.
Ideally little or no stabilizer is used. Again certain pigments can have a stringy consistency or a tendency to separate from the oil. Such stabilizers as waxes (beeswax or aluminum stearate), water, or alumina hydrate are currently utilized to regulate consistency. As these stabilizers modify only very slightly the feel of the paint, you can see why cheaper brands will exploit this opportunity and use them as fillers… which does of course alter the quantity of colour you can make with your paint. Reputable brands do not go there, it would be ridiculous for them to. The cost of raw materials is of course part of the shelf price but the time needed to make a great paint is really the main part of what you pay for.
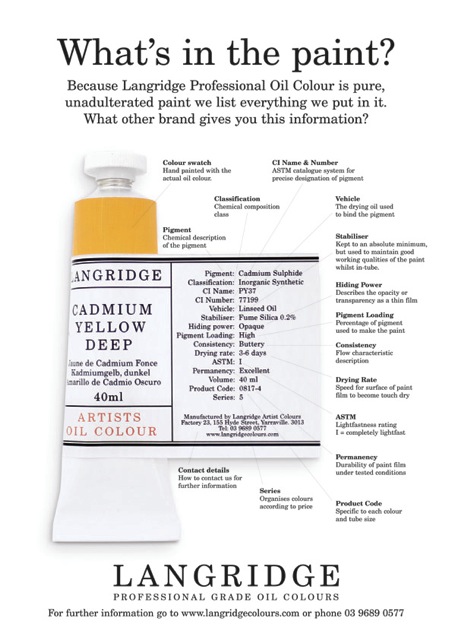 Most serious companies these days will give you detailed information about what’s in their tubes. Either on their charts or directly on the tubes (including a real swatch of the paint which is most helpful). These indications are your best friends and give important infos about opacity, tinting strength, consistency, drying rate, etc. They also help you compare colours when the names are confusing : just check the pigment name which is the true one as unfortunately -and as amazing as it may seem- the name of the color on the tube does not necessarily indicate what is in the tube!!! Sometimes, cheaper brands brag a Cadmium red on their tube when none of the pigment is present, instead a combo of maybe three cheaper pigments which approximate the colour of that pigment. Sometimes too pretty names, like Southern Seas Blue or Australian Sap Green, are a pure invention and you might want to know how many pigments are in there not to mix that colour too much and end up with mud on your canvas. So… have trust in the pigment classification alone… if it not present on the tube… Beware !
With professional grade, the paint is made to come as close as possible to an artist grade in quality, but not in price. Corners might be cut in the milling time, definitely on the quantity of pigment present and maybe only half the line will be mono-pigments. Aluminum hydrate will most probably be present too, in a quantity not required as a stabilizer. You probably could still use this grade mixed with an artist grade without loosing too much quality… or keep your best paints for the final layer.
Student grade paints vary in quality enormously. Some good brands make an acceptable one, others are really not worth the tube they fill. Here you will rarely find mono-pigments, mainly some approximation of these in cheaper mixes. Straight out of the tube, they might be usable but as soon as you mix them between themselves and because colour in paint is a subtractive affair remember (don’t remember? click here) your eyes will not see anything much else except a dull muddy paste. Fillers and oil make for more than half of the tube making it hard to use them properly, hardly giving you your money’s worth anyway.
Of course you can mix all qualities together, nothing will « happen » and you won’t even go to hell (especially if you explain it was done in desperation to finish a painting at 2 in the morning !) Simply know that on average you will lesser the quality rather than improve it… unless we are talking white for which I see and hear two distinct schools in my shop. Some artist buy cheap white, after all what can go wrong with Titanium white, right ? Well, apart from not really getting your money’s worth in pigment, hence in tinting power, nothing much I reckon. But if you can’t really afford top quality paints, listen to this. Some professional artists don’t either but buy the very very best white : Flake white from Blockx or Tit, Zinc, Tit/Zinc from any good brand. They say that 50% of their painting –if not more- is composed of white and by doing so they feel they are considerably improving the overall quality of their paints !
Talking of money, I can understand finances might not be top notch when you are a student but I can never quite get why you would want to learn a trade without the proper tools. Do you think those learning how to fly go for the cheap option in pop rivets? Or a apprentice carpenter would learn to saw with a dollar one from the cheap shop ? You could use bad canvas and paper (and might regret it because after all you could produce something you like and want to keep) but cheap colours are beyond me. Pigments are complex animals, understanding which are opaque, glossy, heavy etc. finding out the ones you like, how to mix them, what hues they will offer with white added, when glazing etc. seem to me part and parcel of the fun AND of the learning curve. OK end of rant… my final advice though is « Buy the best quality you can afford on the day you buy your paint. »
One last word however, perhaps even a little warning… Some paints do contain dangerous pigments (Flake White just mentioned, the Cadmiums…) and are these days mostly clearly labelled. Of course you can use them, simply avoid touching them or sucking your brush! In fact, despite the fuss made around them, they are hardly the problem at all. Turps (and perhaps odourless turps are even more cheeky since you cannot even smell them) can enter your body through your skin and when breathing (and paint thinners from the hardware store are even worse). So, if you are sensitive –more and more people seem even allergic- and still don’t want to switch to acrylics (which I understand fully although « open » acrylics seem these days to please quite a few oil die-hards), many brands offer solvent free mediums, and solvent free hand/brush cleaners too. They might not exist in as large a range as the solvent based ones but they exist and do the job.
 So use your common sense, develop good work habits, get some basic knowledge about the hazards concerning the materials you use and… the joy of oil painting truly should still be yours in very old age!
If you would like to read more about related sections, please click on the (underlined) pages below… not all done yet… sorry!
III. f) Oil
- III. f2) Sticks
- III. f3) Gessos & Grounds
- III. f4) Mediums
- III. f5) Varnishes